The busy Project Manager's guide to managing task dependencies in Jira
Share on socials
The busy Project Manager's guide to managing task dependencies in Jira: 5 steps to project success


Jump to Section
Jump to section
What are task dependencies?
What are the different types of task dependencies in Jira?
How to set up issue linking in Jira
5 steps to mastering your task dependency management in Jira
1. Decide where your task dependencies are
2. Link your issues and set the dependency type
3. Identify task dependency chains with Hierarchy for Jira
4. Create custom saved views to filter through your tasks
5. Forecast your Jira project timelines with pinpoint accuracy
Take control of your complex projects with Hierarchy for Jira
Complex project dependencies don't have to mean missed deadlines and frustrated teams. In this guide, we'll show you how to take control of your Jira task dependencies with practical, actionable steps.
Monday morning status update: "The new checkout feature is 90% done!"
Wednesday afternoon reality: "Actually, we're blocked by three different teams."
Thursday morning update: "The API team is swamped until next sprint."
Friday evening realisation: "This is going to take another month…"
Sounds familiar? You're not alone. Recent research has found that only 34% of organisations complete their projects mostly on time or always on time. The culprit? Usually, it's hidden task dependencies that weren't obvious until it became too late.
I spoke with Darren Ching, Product Manager for Hierarchy for Jira here at Upscale, about how to best manage task dependencies in Jira. In this guide, we'll show you how to set up your task dependencies, avoid common pitfalls, and keep your projects running smoothly, even when navigating complex relationships between your tasks in Jira.
Let's dive in!
Key takeaways:
- Effective task dependency management is crucial for success: get it right, and you'll always be on top of the most important tasks, at the right time. Get it wrong and it could mean missed deadlines and frustrated teams, directly impacting project success rates.
- Jira supports four fundamental types of dependencies: Finish-to-Start, Start-to-Start, Finish-to-Finish, and Start-to-Finish. These dependencies can be configured using the 'Issue Linking' feature.
- Proactive identification of task dependencies, ideally involving the entire team, is a vital first step to ensure all project and task prerequisites, as well as potential blockers, are clear to all team members upfront.
- Identifying dependencies upfront is a fundamentally human process. Understand your dependencies by bringing your team together and asking questions like 'What inputs does this task need?' and 'What tasks cannot proceed without this one?'.
- While Jira's native issue linking provides visibility into immediate dependencies, Hierarchy for Jira allows you to visualise your full task dependency chain, giving complete clarity into what to prioritise and which blockers to expect at various stages of a project.
What are task dependencies?
Task dependencies are relationships where one task needs to be completed before, after, or in tandem with another task.
We all deal with task dependencies on a daily basis.
Think about launching a new feature:
- You can't deploy it without testing.
- You can't test without coding it in the first place.
- You can't code without clear specifications.
- You can't write specifications without understanding your end-user needs.
Each step depends on the previous one, creating a chain of dependencies.
When you add hundreds of other tasks, and multiple team members, effective task dependency management can mean the difference between a smooth launch and long delays.
What are the different types of task dependencies in Jira?
Before diving into the technical setup, let's understand the four fundamental types of dependencies you can set up in Jira:
- Finish-to-Start: Task B can't start until you complete Task A (e.g., testing can't start until development is complete).
- Start-to-Start: Tasks A and B must begin at the same time (e.g., frontend and backend development starting together).
- Finish-to-Finish: Tasks A and B must be completed together (e.g., documentation must be finished when the feature launches).
- Start-to-Finish: Task A must start before Task B can finish (e.g., your new system must be operational before the old system can be decommissioned).
The most common type is finish-to-start, but the correct dependency depends on your unique project.
How to set up issue linking in Jira and start seeing your task dependencies
To use task dependencies in Jira, your Jira admin will need to turn on the 'Issue Linking' feature.

Configuring issue linking in Jira (source: Atlassian)
It takes a few minutes to set up, and once issue linking is on, you'll have access to the default issue link types. You can also add your own custom issue link types.
You can then define your issue links and task dependencies at the start of your projects, making it easier to keep your team on the same page.
5 steps to mastering your task dependency management in Jira
So, you know what task dependencies are, how they relate to the issue links feature in Jira, and why you need them. Now, we'll look at how you can implement these in practice.
1. Decide where your task dependencies are
Our Product Manager, Darren, emphasised the importance of this step, saying: "Whether you're starting a new project or picking up an existing one, you need to sit down with your team and talk with them on how to best connect your issues—if they need to be connected."
While you could try to do this as the project or product manager, it's important to get your team involved.
They'll know the nuances of specific technical tasks and will know what other tasks their previous work depended on.
As the project manager, you'll also be able to provide your higher-level viewpoint and can help them identify dependencies that may not be immediately clear to your project team.
If you're unsure of how to identify task dependencies upfront, here's a simple set of questions you can ask for each task:
- What inputs or prerequisites does this task need to start?
- Examples: design specs, API documentation, stakeholder approval.
- What other tasks cannot proceed without this task being completed?
- Examples: testing tasks, deployment tasks, customer-facing updates.
- Are there any tasks that must run simultaneously with this one?
- Examples: frontend and backend development, documentation updates.
- What's the impact if this task is delayed?
- High impact = a critical dependency that needs close monitoring.
- Low impact = you can be more flexible.
By asking these questions, you'll be able to understand where your obvious task dependencies are.
Pro tip: try to strike a balance by linking your important tasks together, but don't get too deep in the weeds.
If every issue or task has multiple issues linked to tangential—but not essential—task dependencies, it's likely to get overwhelming, and you'll lose sight of what the most important task dependencies really are.
2. Link your issues together in Jira and set the dependency type
Atlassian has a handy guide on issue linking here, but here's the summary:
- Open an issue or select 'more actions (...)'.
- Select 'Link issue'.
- Search for an issue to link, or click 'Create linked issue' to create a new issue.
- Choose how they relate to each other (e.g., 'is blocked by' or 'relates to'), then select 'Link'.
- If you created a new linked issue, you'll need to fill in the required issue creation fields, and then select 'Create'.
And that's it!
Your issues are now linked together.

All of your linked issues show up directly on each issue with dependencies.
With issue linking in place, you'll be able to see what task dependencies each Jira issue has and what you need to be aware of.
You can also link issues across different projects. For example, when the product team develops a new feature, the marketing team needs to prepare promotional materials. By linking Product Development tasks to Marketing tasks, teams can coordinate their timing, and ensure everyone is on the same page regarding the new feature launch.
3. Identify key task dependency chains with Hierarchy for Jira
By default, Jira lets you see one step ahead in your dependencies. You can see what tasks block or are blocking any other single task in your backlog.
However, you can't see the entire chain of dependencies that relate to these tasks.
For example, when looking at a complex feature launch, you might think you're ready to deploy, only to realise you're blocked by dependencies you hadn't considered: the API isn't ready, the documentation needs updating, and QA testing hasn't started.
That's where Hierarchy for Jira comes in.
Hierarchy for Jira lets you visualise your long task dependency chains in Jira, giving you clarity over every task dependency in your project.
Once you install it from the Atlassian Marketplace, you can immediately start seeing your task dependency chains in a handy visual hierarchy. Hierarchy for Jira has a completely free 30-day trial, so you can try it out on your projects.
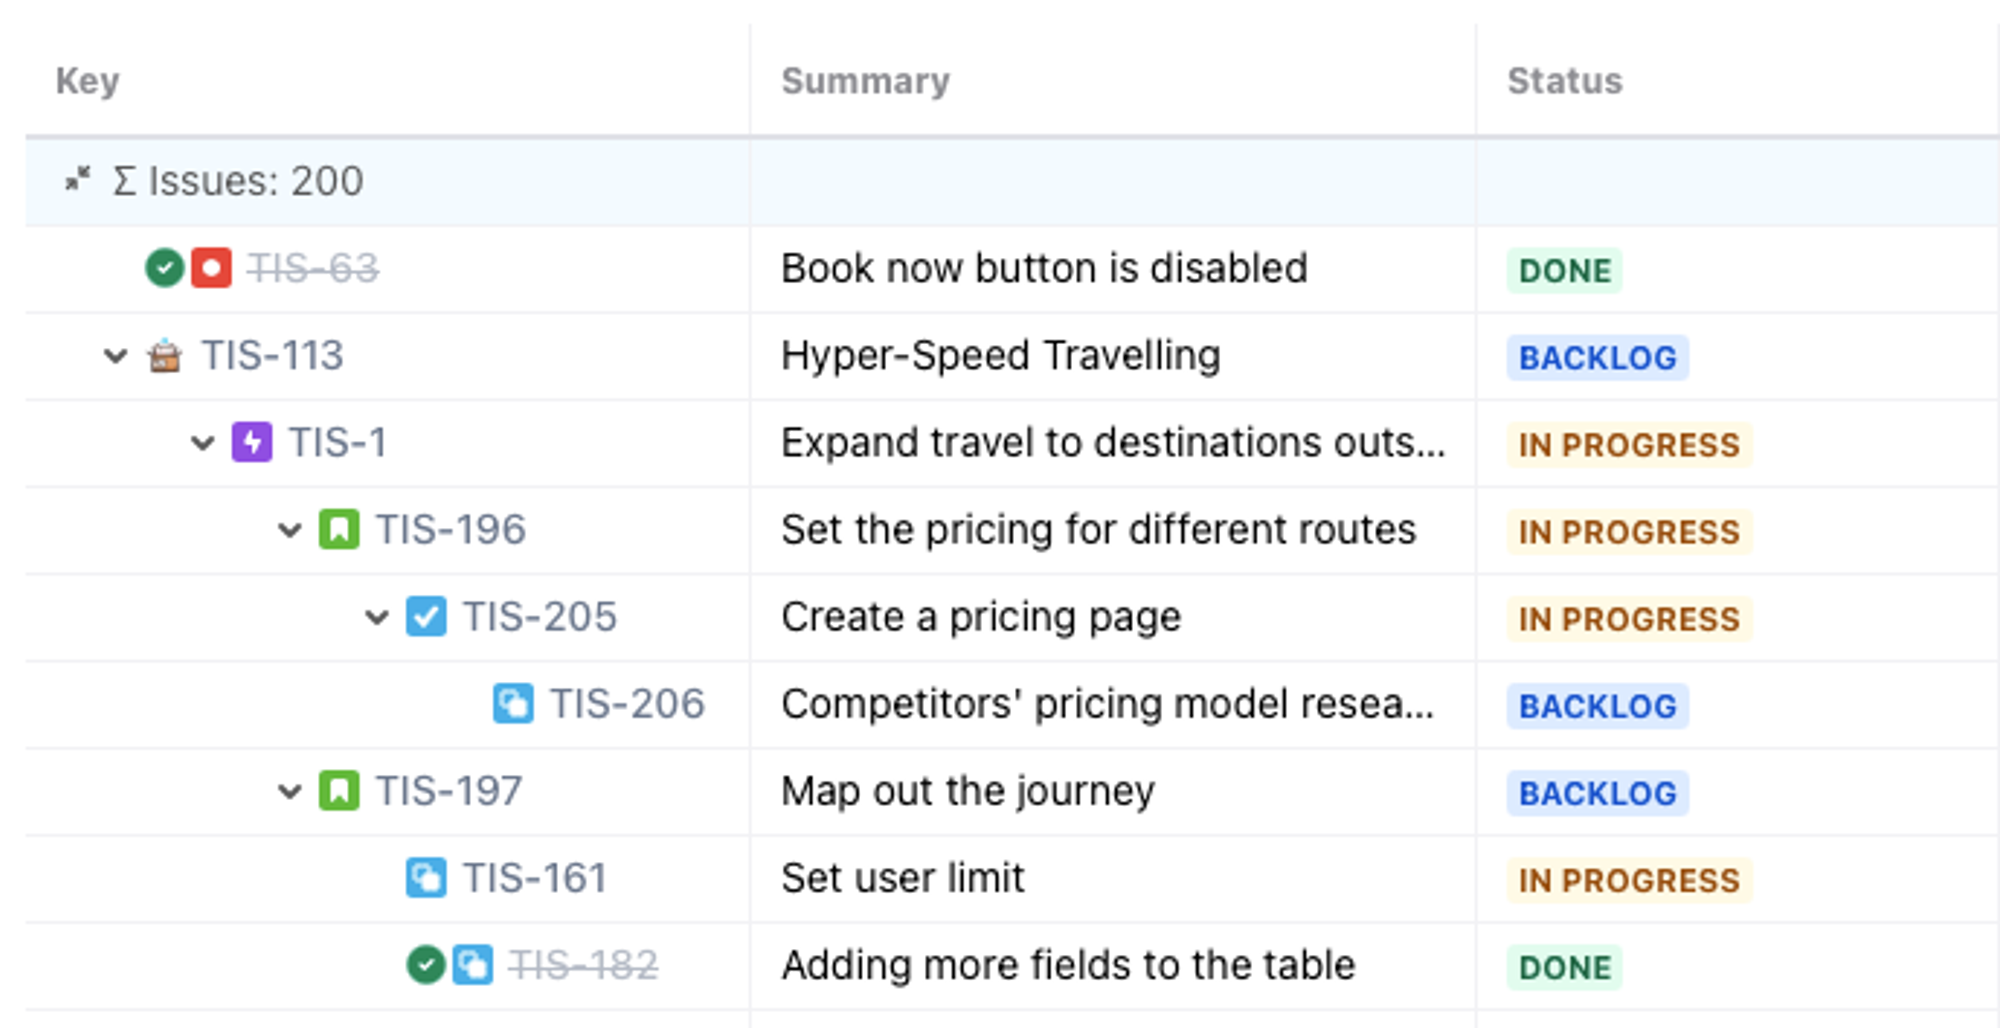
Each indentation represents a level deeper in your chain of task dependencies.
In the example above, we can easily view our project goal: in this case, Hyper-Speed Travelling.
However, achieving our end goal of Hyper-Speed Travel is blocked by multiple tasks.
If we follow this custom issue hierarchy all the way down, I can quickly see that the first task is 'Competitor pricing model research'.
Once we know the general market price for premium Hyper-Speed Travel, we can decide on our pricing strategy and then proceed to 'Create a pricing page'.
Everyone on your team with access to Hierarchy for Jira can see how their tasks link to other tasks, and then prioritise work that blocks other team members' work.
You can also filter your Hierarchy for Jira tree view to focus only on the issues you care about at any moment in time. For example, you may want to only see issues that have a 'Depends' link.
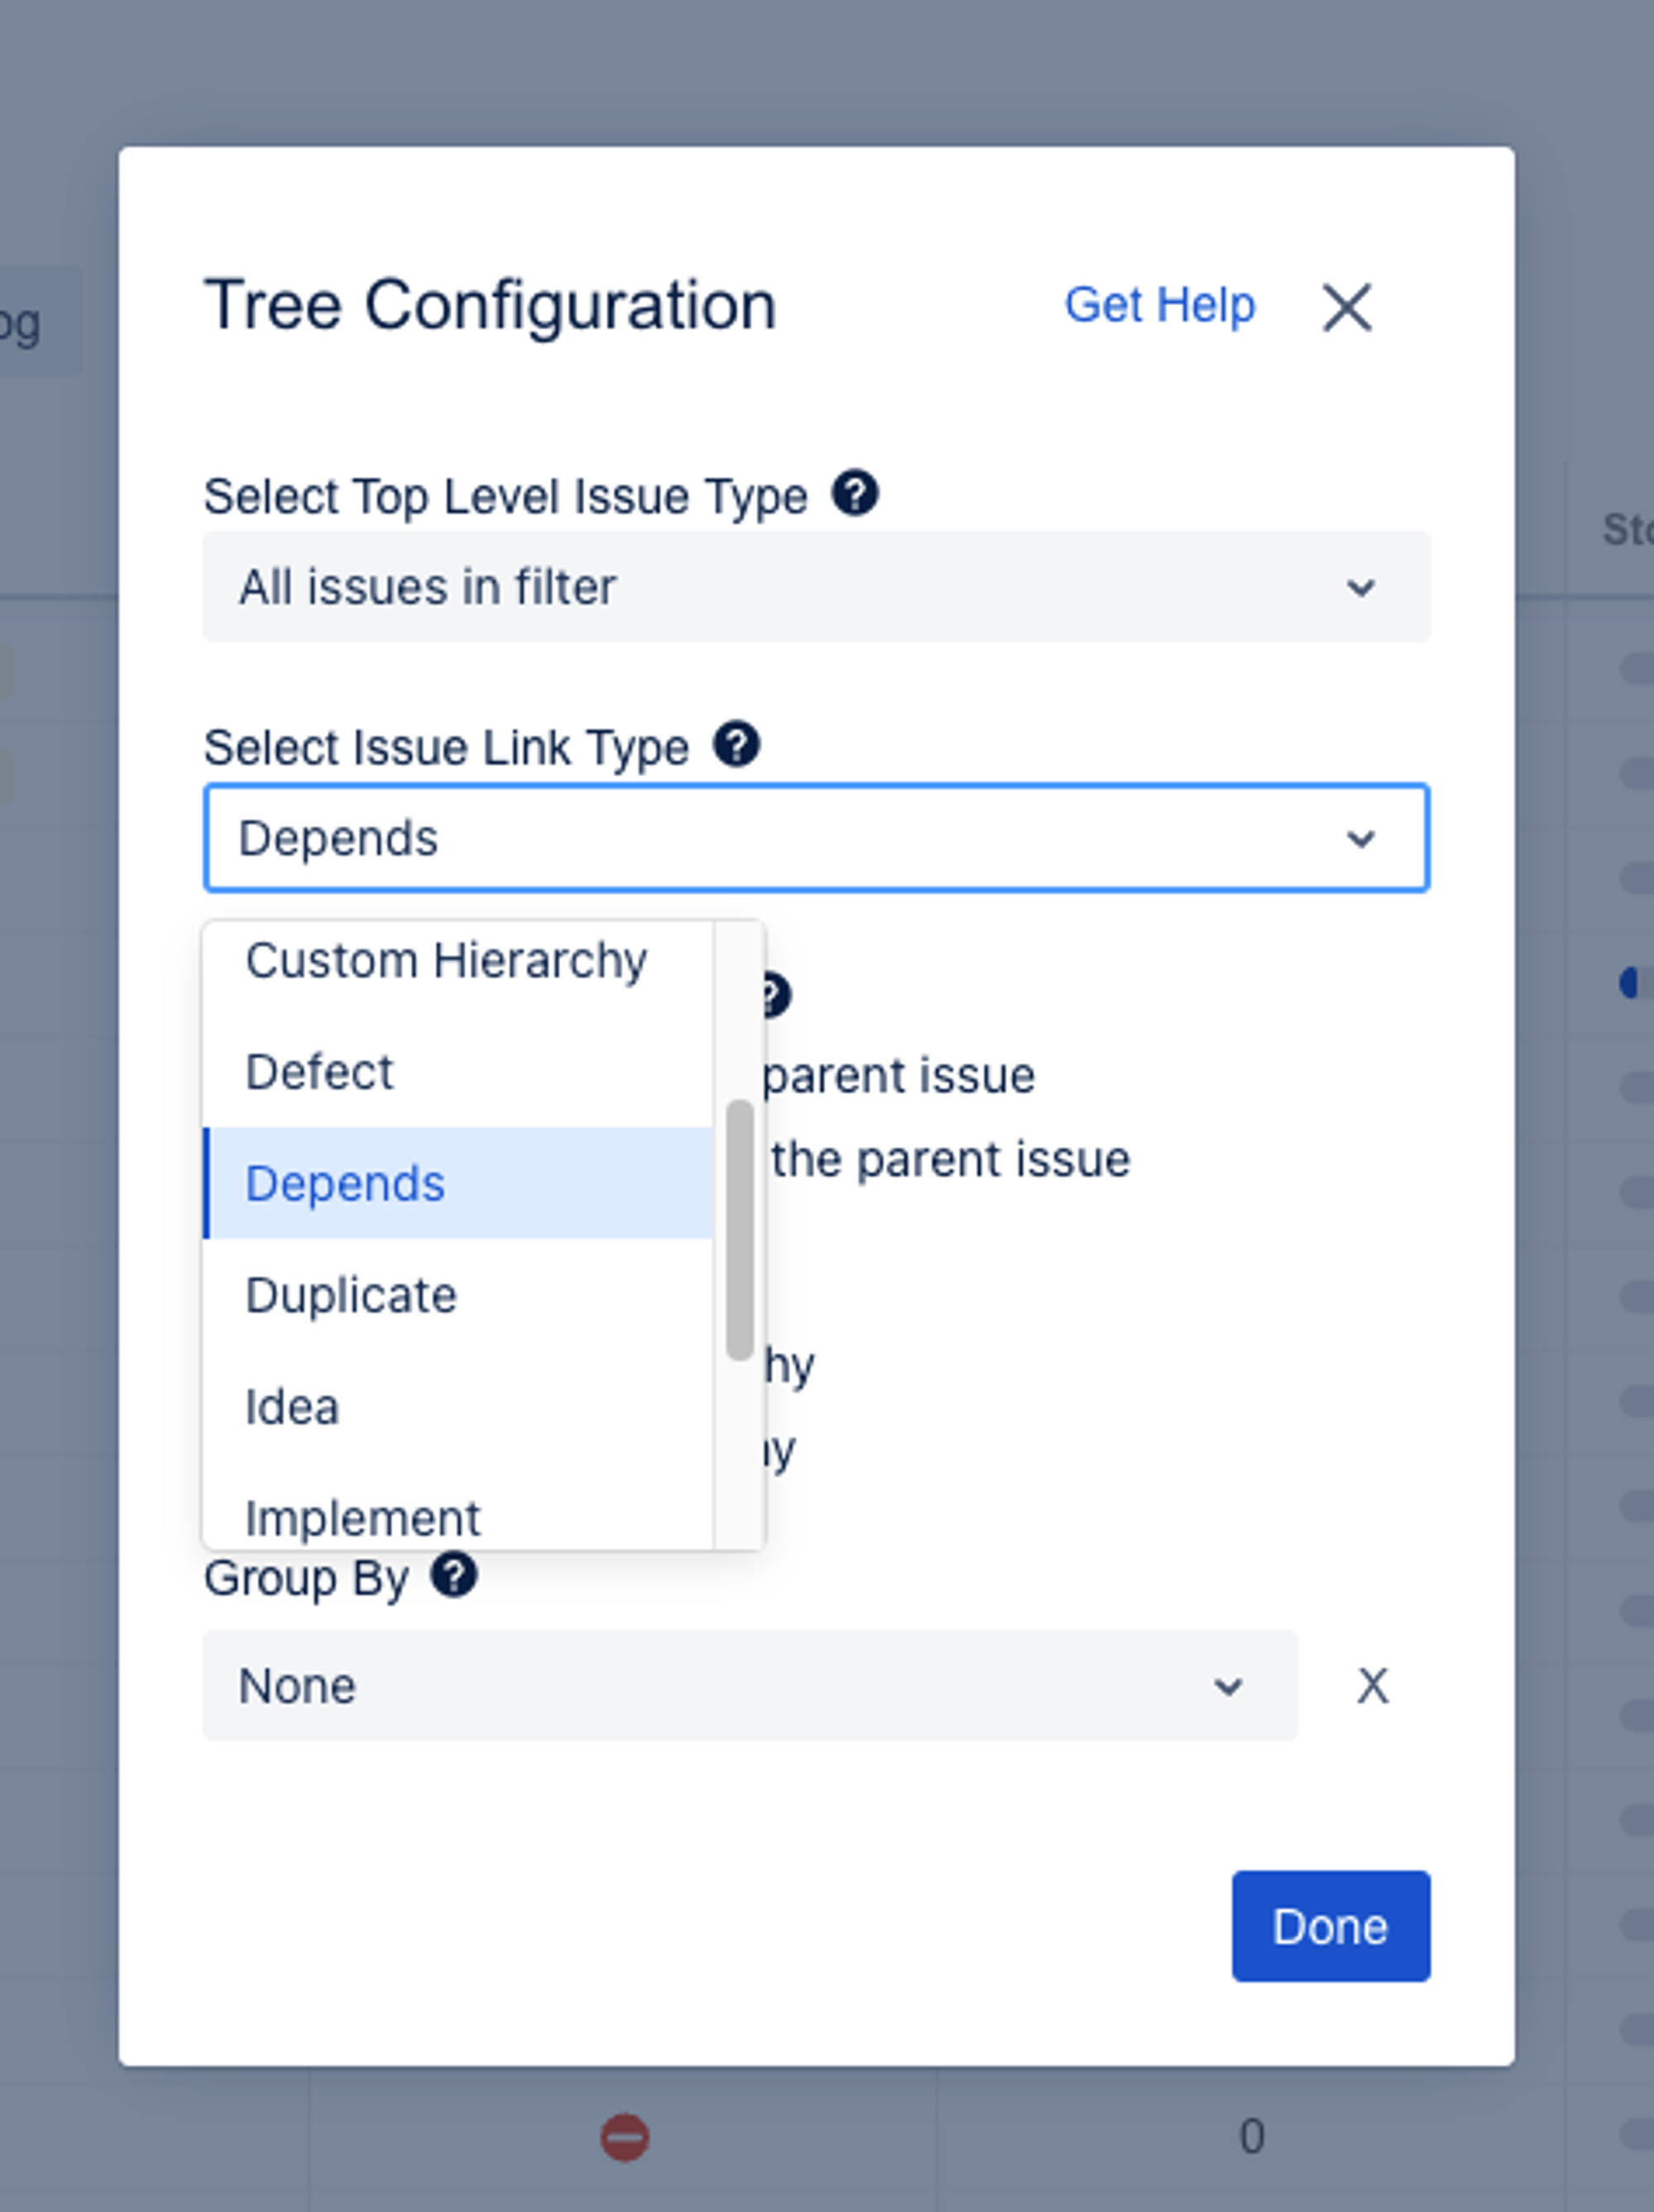
Easily structure your Hierarchy for Jira tree view based on what you need to see.
Once you've selected your issue link type, Hierarchy for Jira will instantly show only issues with that link type in your tree view.
If you prefer an even more visual, schedule-focused approach to dependency tracking, switch to Hierarchy for Jira's timeline view. Your work items appear on a Gantt-style timeline, with dependencies shown as lines connecting them. You can instantly see:
- Which tasks are blocking others.
- Whether there are scheduling conflicts.
- How delays in one task affect downstream work.
If a dependency chain needs adjustment, drag timeline bars to reschedule a task, and your changes update the underlying Jira work items automatically.
Easily structure your Hierarchy for Jira tree view based on what you need to see.
As a product or project manager, you can now proactively identify task dependencies and make sure your team is on track with anything that risks becoming a blocker.
4. Create custom saved views to filter through your priorities
We all have stakeholders involved in our work. It might be your Head of Product asking when a key feature is going to be ready, or it might be your engineering team looking for a sense check on overall project progress.
To stay productive, you need a simple, quick way to surface key information when you need it.
The best way to do that? Saved Views. These allow you to create custom reports that only include the issues you need to see.
To start with Hierarchy for Jira's Saved Views, you'll need to find the information you need using Quick Filters.
Quick Filters are JQL expressions that allow you to select any type of issues you need.

Save as many Quick Filters as you need to surface the right information.
For example, you might want a Saved View that includes only Critical issues, or only issues assigned to you. You can then build a Quick Filter to find the information you need, and save that as a new Saved View.
You can then switch between Quick Filters at a glance, instantly surfacing the information you need, when you need it.

Switch between your Quick Filters in a click.
One of the best parts?
You can send your Saved Views to other people with a handy shareable link. You might have one Saved View that includes key details that your team lead needs, and another that you use to keep your project team on track on a day-to-day basis.
If your stakeholders aren't using Jira, no worries—just export your Saved View as a CSV file and share it in Google Sheets or Excel.
5. Forecast your Jira project timelines with pinpoint accuracy
Identifying the relationships between issues is useful, but it doesn't tell you that much. More importantly, project managers need to know the impact of specific issues on the project as a whole.
Using Jira's Story Points feature, you can quantify task complexity and impact. Here's a basic Story Point scale for feature development:
- Fix a CSS styling issue: 1 story point
- Fix a typo in the in-app notification: 1 story point
- Add form validation for user registration: 2 story points
- Add user authentication: 5 story points
- Create file upload functionality: 5 story points
- Build an analytics dashboard: 8 story points
- Implement a payment processing system: 12 story points
While these are just examples, you get the picture. Some tasks take more time and work than others do.
You need to know the impact of different tasks, as it will help you as a project manager to forecast more accurately.
Hierarchy for Jira allows you to easily roll up and sum up your story point total and understand the impact of every task on your overall project.

Easily roll up story points to understand the total effort required.
You'll know how much effort is being channelled into each item of work on your project, and you can then easily estimate how long it'll take to hit key milestones. If you’d rather use time instead of story points, that’s okay—you can use Hierarchy for Jira’s time tracking report that shows you estimated time remaining in your project, based on time that has been spent on tasks so far.
You can also allocate resources more effectively: if you know a team member is going to be tied up on a complex task, you can avoid asking them to context switch and help another team member troubleshoot a bug.
You can roll up your story points all the way to the Epic level and above, ensuring you always know how your project timelines influence wider company initiatives.
For even more accurate forecasting, use Hierarchy for Jira's cross-project timeline view's baseline feature.
Baselines capture your original planned dates, then show you exactly how far work has drifted from the plan.
Grey bars display your original schedule, with dotted lines indicating drift. It's perfect for identifying which tasks need attention and for having more context around timeline changes when talking to key stakeholders.
Ready to take control of your complex Jira projects?
Managing task dependencies effectively can be the difference between a smooth-running project and one that's constantly hitting roadblocks. While Jira's native functionality gives you the basics, a purpose-built app like Hierarchy for Jira will help you get a complete picture of how your work fits together.
Here's what you can do today to start managing your task dependencies more effectively:
- Map out your existing task dependencies with your team.
- Set up issue linking in Jira (if you haven't already) and connect related tasks.
- Install Hierarchy for Jira to start visualising your full task dependency chains in a custom hierarchy and visual project timeline.
- Create your custom Saved Views, each with the key information you need to keep stakeholders informed on progress.
- Start forecasting more accurately with rolled up and summed up story points and time tracking metrics, as well as the helpful baseline feature, which shows how tasks have drifted from schedule in your timeline view.
Once everything is in place, you'll have clear visibility into previously hidden task dependencies and can proactively help your team members focus on the tasks that matter most when they matter most.
Ready to uncover newfound visibility into your task dependencies in Jira?
Start your free 30-day trial of Hierarchy for Jira and see the difference clear task dependency management can make to your complex projects!
Frequently asked questions
What are the different types of task dependencies in Jira?
There are four fundamental types of dependencies you can set up in Jira: Finish-to-Start, Start-to-Start, Finish-to-Finish, and Start-to-Finish. The most common type is Finish-to-Start.
How do I set up task dependencies in Jira?
To use task dependencies in Jira, your Jira administrator needs to enable the 'Issue Linking' feature. Once enabled, you can define your issue links and task dependencies at the start of your projects, helping to keep your team on the same page. You can use default link types or add your own custom ones.
How can Hierarchy for Jira help with task dependency management?
Hierarchy for Jira allows you to visualise your complete task dependency chains, providing clarity over every task dependency in your project. It helps you proactively identify dependencies and ensure your entire team is on track with anything that risks becoming a blocker.
Can I forecast project timelines more accurately when I know my task dependencies?
Yes, full visibility into your task dependency chains helps with accurate forecasting! Hierarchy for Jira allows you to roll up and sum story points at every level of your work type hierarchy, helping you understand the total effort required for each task and estimate how long it will take to hit key milestones. You can also use its time tracking report to see the estimated time remaining in a project, based on time spent on tasks.
Related Content
Read more


Written by
Atlassian
Jira
Project Management
Related Content
Read more